Cara Mendapatkan Uang dan Dolar dari Blog

Posted by Unknown Jumat, 30 November 2012 0 komentar
Cara Menghasilkan Uang/Dollar dari Blog

Cara Mendapatkan Uang dan Dolar dari Blog. Apakah anda Seorang Blogger yang ingin mendapatkan penghasilan dari Blog anda ?

Kali ini saya akan membagi Cara Mendapatkan Uang dan Dolar dari Blog, caranya yaitu dengan mendaftarnkan blog anda di situs PPC seperti Google Adsense yang iklannya seperti di blog saya ini, atau Kumpulblogger, AdsenseChamp dan masih banyak lainya. Jika anda mendaftar adsense blog anda akan di suvey apakah layak dengan syarat-syarat yang di tentukan oleh adsense. Jika anda mengunakan layanan ppc di indonesia biasanya blog anda tidak di survey terlebih dulu tpi sebagian si memang ada, tapi itu hanya sedikit. Setelah blog anda sudah di daftarkan maka buatlah jenis iklan yang anda mau seperti leaderboard, banner, persegi dan lain-lain. Sesuaikan tempat pemasangan iklan di blog anda, jangan sampai menggangu pengunjung blog anda itu saran saya, tempatkan iklan yang mudah di baca oleh pengunjung biar iklan menjadi terbaca dan membuat pengunjung ingin mengeklik iklan di blog anda.

Menghasilkan dollar atau Uang dari blog sebenarnya bukan itu saja tapi masih banyak lainya seperti mengikuti kontes seo dan lain-lain. Cari saja di internet banyak kok penyedia yang bisa menghasilkan uang untuk anda. Sekian dari artikel saya ini semoga membantu anda dalam menghasilkan dollar atau uang dari internet :)

Baca Selengkapnya ....

Karbonn A9+ Full Review

Posted by Unknown 0 komentar

Karbonn A9+

Retailing @ a market price of र 9000/- , Karbonn A9+ is the successor to the previously released Karbonn A9,
It runs on Android 4.0 ICS , and houses a dual core Qualcomm Snapdragon MSM8625 processor running @1.2Ghz , Coupled with 512 MB of ram .
Its got 2.7Gb of internal storage , which can can be expanded via a memory card.
On the Camera front it has a 5 MP rear facing camera with LED Flash along with a 1.3MP front camera for video calling .Its got Bluetooth v2.1 , Wi-Fi b/g/n , & Wi-Fi Direct .
The front of the device houses a 4 inch WVGA IPS Panel (great feat for र9000) along with a proximity sensor & the front facing 1.3 MP camera .

Interface

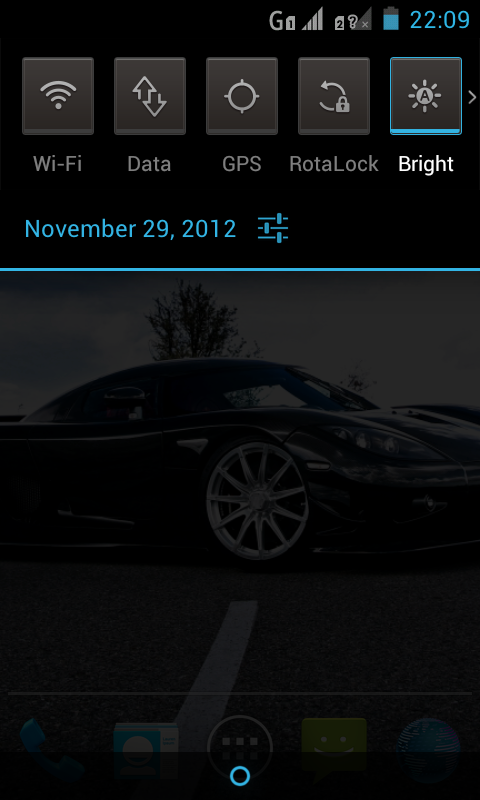
Power up the device and you are welcomed by a stock android home screen .


The device is powered by Android ICS 4.0.4 ,

The notification bar can be pulled from the top ,which has been customized to have shortcuts for turning on/off Wi-Fi,Bluetooth,etc.
The Dialer has been customized by Karbonn, but overall its a very stock experience.
In my testing i used a single sim only & the Call reception was good with this device. 
The device feels snappy with absolutely no lag browsing through the app drawer & opening apps .
The Keyboard is stock except with a minor change to include "smileys" instead of the ↵ key.(???WHY???)

Multimedia

The IPS Panel has very good viewing angles & makes up for a overall great experience .The device has a dual core Qualcomm S4 Play Snapdragon Cortex A5 CPU & a Adreno 203 GPU , on the multimedia front you can't expect this device to outperform the top notch devices , but it is able to holds its own .

Video Playback

480p videos play buttery smooth, but I had problems playing 720p videos on the device , Although Lowering the Bit-rate did the trick.

Camera

The 5MP Camera can take decent shots in Sunlight , but it produced grainy shots Indoors & at night time .

Rear Camera 

Outdoors


Macro
 Indoors

 Front Camera

The Front 1.3MP camera has decent quality and can be used for self portrait shots & it is usable at night time indoors.
Indoors

Outdoors

Video Recording

Video recorded are of VGA (Read Poor) quality & stored in 3gp format.

Internet

Wi-Fi reception is good , and browsing through the net was a breeze , even with multiple Tabs & Apps opened in the background .
(In the screenshot below, the Keyboard used is the "A.I. Type Keyboard Free" with the IPhone Theme)

Benchmarks

I Ran a couple of Benchmarks on this device and the result were pretty good for a phone costing less than र10,000

Quadrant Standard

 Nenamark 2


Linpack - Single Thread

 Linpack - Multithread

 Multitouch

 Sadly This device only supports upto 2 touch points , which will be a bummer for Games

Gaming

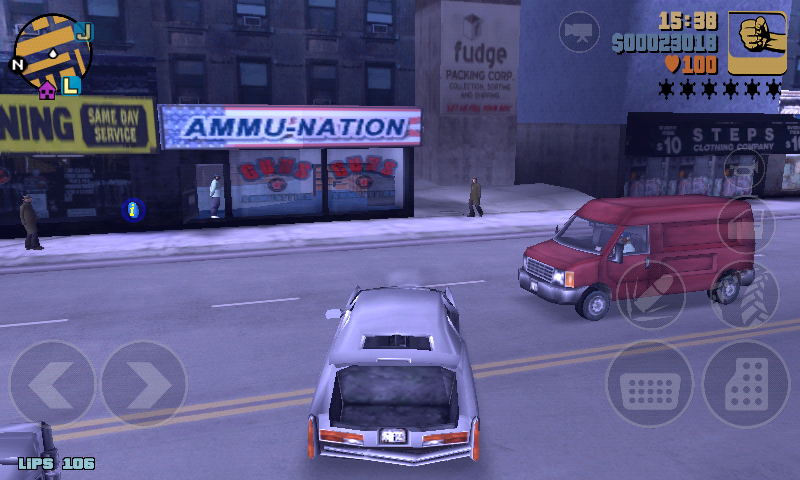
The IPS panel makes Gaming a great experience on this phone .The Games I Tried ran exceptionally good on this phone due to the powerful dual core Qualcomm Chipset. (I will upload a separate video review on Games - Video Link)

GTA 3


 Angry Birds

 Striker Soccer Euro 2012

Battery Life

I used this Device for 2 days & the battery backup was average . I got around 6 hours on usage that included reading emails , texting , Wi-Fi , Watching HD Videos & playing Games. If you limit your usage it will easily last a day .
In my test the battery charged pretty quickly , going from 38% to fully charged in an hour and 12 minutes .
Playing demanding Games at a stretch drained the battery , as I was only able to play GTA 3 for an hour & a half before the battery indication came up .

Conclusion

The Karbonn A9+ has a powerful Dual Core Chipset that outperforms the competition, but has an average battery Backup .
As is with all budget phones you will have to sacrifice a bit on some parts but overall this phone will give you a great Android experience.
Overall , This is a good phone for someone looking for the most powerful phone in the sub 10k segment

Baca Selengkapnya ....

Cara Memperbaiki Hardisk Tidak Bisa di Format dan di Install OS

Posted by Unknown Minggu, 25 November 2012 0 komentar

Cara Memperbaiki Hardisk Tidak Bisa di Format dan di Install OS

Cara Memperbaiki Hardisk Tidak Bisa di Format dan di Install OS


Cara Memperbaiki Hardisk Tidak Bisa di Format dan di Install OS. Halo kali ini ane mau sharing pengalaman tentang hardisk yang tidak bisa di format dan tidak bisa juga di instal sistem operasi, pada awalnya saya menganggap hardisk laptop tersebut rusak karena bad sektor mau pun apa saya tidak tahu.

Setelah saya telusuri dan mencari gejala-gejala yang terjadi ternyata saya mendapatkan gejala seperti ini :
  1. Hardisk kadang tidak terbaca di bios, dan kadang terbaca.
  2. Saat Instal OS, hardisk kadang terbaca dan kadang tidak
  3. Saat Hardisk terbaca dan mau di format hardisk menjadi tidak terbaca oleh sistem
Jika, anda mengalamai masalah seperti saya maka solusinya adalah mendownload driver sata dan menginstalnya pada saat instal OS sepeti Gambar berikut ini dengan mengeklik load driver.

Load Driver Hardisk Winodws 7

Jika anda sudah mendownload drivernya klik browse dan cari tempat direktori temapat anda menyimpan driver yang sudah anda download. Kemudian windows akan secara otomatis mencari driver yang cocok dengan hardisk laptop anda. Bagi anda yang belum tau download drivernya di mana klik di sini.

Setelah itu driver di instal dengan mengeklik next dan jangan lupa mencentang tulisan hiden partition, setelah terinstal coba refresh drive akan tampil dan cobalah untuk memformat hardisk dan menginstal OSnya insya allah akan berjalan normal kembali, Sekian artikel Cara Memperbaiki Hardisk Tidak Bisa di Format dan di Install OS dari saya yang singkat ini semoga bermanfaat bagi anda :)

Baca Selengkapnya ....

HOW TO TAKE THE VOCALS OUT OF A SONG

Posted by Unknown Sabtu, 17 November 2012 0 komentar


Music has always been a great passion for me and for those who know my taste in music they always scream bloody hell….All the same sometimes there are songs I stumble upon and I wish I could just have the instrumentals. I looked for a way to strip out the vocals out of the song and I laid my hands on an interesting freeware that did just what I wanted.

Yes! That was my exclamation when I came across Wavosaur. It is a shareware that strips the vocals out of a song in whatever format and saves it to a location of your choice on your system. Here is a link to download it: http://www.wavosaur.com/download.php
 

HOW TO REMOVE THE VOCALS
Wavosaur is pretty easy to use when it comes to removing the vocals. Here we are going to go step by step on how to do that. Now click on the life folder icon below the Edit button to get the song you want to be stripped of its vocal from any location on your system.

After navigating to the song location and adding it,the screen will appear some like this:

You then proceed to the process key, then get down and click on vocal remover. 

It takes very little time to remove the vocal.
Click now on File, then click on Export and select Export as MP3, from there select where you want the file saved to.

That’s it and you’ve got yourself an instrumental that you can use for karaoke. Hope this helps.
You can drop feedbacks on the comment zone,so we know if this was good.


Baca Selengkapnya ....
Trik SEO Terbaru support Online Shop Baju Wanita - Original design by Bamz | Copyright of samsung galaxy apps.